DESCRIPTION: Unable to Delete Shared Services when it's database is deleted from SQL server.
SYMPTOMS: Unable to delete Shared Services. There are still some objects which are dependent on configuration database and on project serve, due to which users are unable to delete SSP. Manually deleting of SSP using stsadm -o deletessp -title "ssp_name" command also shows same error.
ERROR MESSAGE: “An object in the SharePoint administrative framework, "SharedResourceProvider Name=SSP Parent=SPFarm Name=MOSS", could not be deleted because other objects depend on it. Update all of these dependants to point to null or different objects and retry this operation. The dependant objects are as follows: ProjectPSISharedApplicationTimerJob Name=Project Server Synchronizing Job for 'SSP' Parent=ProjectApplicationService Name=ProjectApplicationService”
RESOLUTION: ° Identify the GUID for the problem SSP. ° Use STSADM -o deleteconfigurationobject -id "id retrieved from object table"
Use the following procedure to identify the Shared Services GUID:
Login to SQL server. ° Open SQL Management Studio and expend Databases. ° Expand Configuration Database & Tables. ° Opened table for dbo.object. ° Executed following query in query analyzer: SELECT * FROM [MOSS_CFG_CA_01].[dbo].[Objects]where name like 'Name of the Shared Services'. ° Copy the ID of object referenced in objects table of configuration database. ° Open command prompt and changed directory to C:\Program Files\Common Files\Microsoft Shared\web server extensions\12\BIN> and executed following command to delete the Shared Services using the ID which was copied: Stsadm -o deleteconfigurationobject -id "id retrieved from object table"
Shared Services should be deleted from the Cenral Administration.
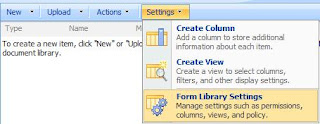 5. Select “Advanced Settings” .
 7. For “Browse-enabled Documents” -> Select “Display as Web Page”. This option is beneficial when users do not have InfoPath 2007 installed on their local machine. The Form will open in the browse if this option is selected.
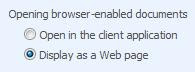 8. Click Ok.
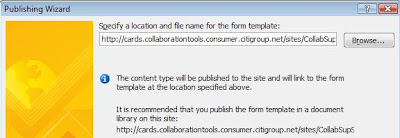
 3. Select “Change Compatibility Settings”. Enter the data as in below screenshot.
 Note:- The URL to be entered should be of the “Site Collection”. Not of a Subsite or Form Library URL. The user publishing this Form should be the Owner/Administrator of the Site Collection URL specified.
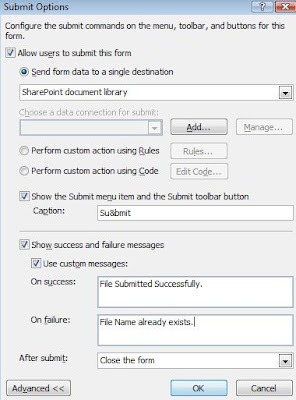 2. After entering the details as required, click “Add” button for “Choose a data connection for Submit”
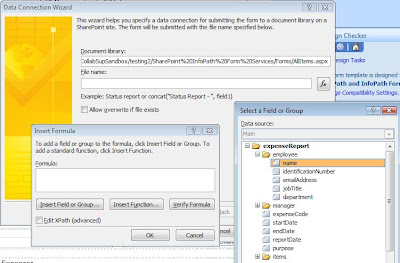 4. When you click on “fx” button you will get the “Insert Formula” dialog box. Click on “Insert Field or Group” button you will get “Select a Field or Group” dialog box.
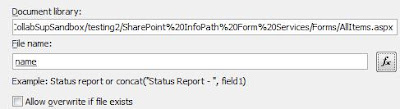 6. Select “Allow overwrite if file exists” as per your requirement and the data you will be entering in the Form. If you select this option you can also Enable Versioning on the library.
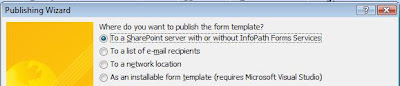 2. Select the option to publish to SharePoint server and click on “Next”
 4. Make sure that the Check box is selected as the screen shot. It is recommended to select “ Site Content Type (advanced)” to avoid manual creation of the content type. Click on “Next”.
 Note:- The 3rd option “Administrator-approved Form Template (advanced)” is to be selected when the Form has Active code or any .net Programming added to the form.
 6. Enter a Friendly Name and Description for the Content Type. Click on “Next”
 8. Add Columns to your Form Library. Click on “Next”
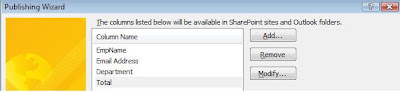 9. At the end it will give the summary of the options selected and Click on “Publish” button. Once you get the Message “Your Form template was Published Successfully” Click on the “Close” button.
  2. Click on “Add from existing site content Types”. From the drop down list select “Microsoft Office InfoPath”. Add the “Content Type”. Click on OK.
 3. You will now see 2 Content types, the default (Form) and the one you just added. You can delete the default content type if required.
