Showing posts with label SharePoint ONline. Show all posts

Monday, April 9, 2018

Microsoft Flow | SharePoint Online | Delete all Subsites using REST API

Scenario: You want to Delete all the Subsites within a Site Collection. if you are not a Java script/CSom coder or Powershell scriptor this may help you.

Solution: I will show you a simple Microsoft Flow logic to delete the subsites further you can add conditions for specific subsites and or start approval flows as well for the same and perform your actions as per your requirement.

Overall Successfully running Flow 


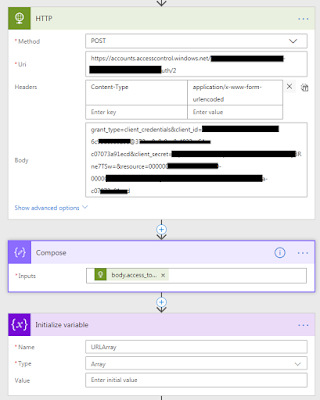
1. First Step will be to get the Access Token for HTTP Request to run REST API calls. I have written a blog on this. If you need me to write an article on Getting Access Token, please leave it in the comments below. 

2. from the HTTP POST call, we need to store only the Access Token, so using Compose action, enter [ "@outputs('HTTP').body.access_token" ]  (without box brackets)

3. I am initializing a Global Variable as Array to Store the URL of the subsite, which we will need in the last step of Deleting the subsite. 


4. Now you need to again call HTTP method GET for the site collection and obtain all the subsites under it "/_api/web/webs"

5. Set the Global Array variable to have the results of all subsites obtained in array. [ "@outputs('HTTP_2').body.d.results" ]  (without box brackets)

6. Add 'Apply to Each' and insert the global variable (as the input)

7. Add 3rd HTTP action to finally delete the subsites. Use "Delete" as Method. URI will be as an expression item()?['URL']  and without adding any space append ' /_api/web '

Pls. Note:- This will delete the subsites permanently, they will NOT go to 1st stage Recycle Bin or 2nd stage or Recycle Bin.


This is the basic logic of deleting the subsites, you can further customize it as per your requirement if you need to send an approval mail to the owner of the subsite or check if there are nested subsites etc...


Wednesday, March 20, 2013

Map Network Drive / WebDav with SharePoint Online O365

WebDav with SharePoint Online O365

Issue: While Mapping a Drive to SharePoint Online it fails with below error.

Error:
The Mapped Network Drive could not be created because the following error has occurred.'Access Denied'. Before opening files in this location, you must first add the web site to your trusted sites list, browse to the web site and select the option to login Automatically.


Resolution:
  1. Open IE -> Go to ‘Internet Options’
  2. Select ‘Security’ tab -> Select ‘Internet’ Zone.
  3. UnCheck the box for ‘Enable Protected Mode’
 

Issue: You are using SharePoint workspace and when you try to save the file opened from Workspace. The Save location changes to local machines Temp folder instead of SharePoint Online Library from where the file was accessed. While Saving or ‘Save As’, the location should default to the SharePoint Online library itself and not the local machines temp folder.

Check / Troubleshoot:
  1. Make sure the ‘Web Client’ service is started on the client machine.
  2. Open the SPO site -> go to the Document Library
  3. Select ‘Open with Explorer’ [ Make sure this is working fine ]
  4. Delete IE Cache.
  5. In IE ‘Trusted Sites’ zone add ‘https://*.sharepoint.com’
Note: This is basically working on the WebDav functionality to work which is related to “Open in Explorer” mode from a SharePoint Document library. If you notice that the library does not open in Explorer Window from the site directly, your Save As option will redirect you to temp folder instead of the Site URL.
 
Note: Some users may complain that after certain period of time the mapped drive disconnects or they are asked to enter the credentials again for O365. This will happen if the time period has extended over 8 hours. This is default behavior by Design. They will need to refresh the credentials. This may also occur if users have not selected “Keep me signed in” checkbox while they sign in through Microsoft Online sign-in assistant.
 
Users can't sign out of Office 365 web services
http://support.microsoft.com/kb/2507767
 
Note: This is a known issue with Office 2013 64bit version. it will not work.

Step by Step configuration to Add custom Refiners in the Refinement Panel of Search Results page for SharePoint Online

Scenario:
You may have custom Library/List columns created which you would like to show them in the Refinement Panel on the Search Results.

Step 1: Creating a Document
Library / List with Customer Columns

  1. Create a New Document library -> go to Library Settings
  2. Create a new Column “Product Type” – Choice Field is what I selected.
  3. Upload some documents to the library and give different Choice options.


4. Go to Library Settings -> Advanced Settings -> Click on ‘ReIndex Document library’ Button.


Step 2: Creating a New SiteCollection or Sub Site using “Enterprise Search Center” template. (Note: the reason we need to do this is due to the fact that we
cannot modify the OOB ‘osssearchresults.aspx’ page)

I created a Subsite under my site collection using the ‘Enterprise Search Center’ template. Make sure that you are able to search the documents uploaded.
 
Step 3: Configuring Managed
Properties for Search

  1. Logon to Microsoft Online Portal (MOP)
  2. Go to SharePoint Online Administration Center page.
  3. On the Left Panel -> Select ‘Search
  4. Click ‘Manage Search Schema
  5. Search for Existing Managed property ‘RefineableString00’ -> Edit the property and set it up as per below. -> Click 'OK'

 
Note: By Default in SharePoint Online you cannot create a new Managed Property as ‘Refineable’, due to which we need to use the existing ones and give an Alias for that.
http://office.microsoft.com/en-us/office365-sharepoint-online-enterprise-help/manage-the-search-schema-in-sharepoint-online-HA103628856.aspx#_Toc351360838


 Note: List of Default Existing Refineable Property list.http://technet.microsoft.com/en-us/library/jj219667(v=office.15).aspx#DefaultUnusedMPs 
 
Step 4:Adding the Managed Property to Refinement Panel on the Search Results Page
  1. Go to the Subsite Search Center site created in Step 2.
  2. Type in any keyword to go to the ‘Results.aspx’ page. -> ‘Edit’ that page.
  3. Edit the Refinement Panel web Part. -> Click on ‘Choose Refiners…’ button.
  4. From the list of ‘Available Refiners’ -> Select ‘RefineableString00’ -> Click ‘Add’ button.
  5. Change the ‘Display Name’ for it (Initially it may not show the Sample Values, wait for around 5-10 mins to take effect )
  6. Click ‘Ok’ -> Save and Close the Page -> Check-In and Publish the Page
 

Now when you perform the Search for documents in that library, on left Refinement Panel you will see the new Refiner “Product Type


Total Pageviews