Friday, August 15, 2008

Unable to delete Shared Services

DESCRIPTION: Unable to Delete Shared Services when it's database is deleted from SQL server.

SYMPTOMS: Unable to delete Shared Services. There are still some objects which are dependent on configuration database and on project serve, due to which users are unable to delete SSP. Manually deleting of SSP using stsadm -o deletessp -title "ssp_name" command also shows same error.

ERROR MESSAGE: “An object in the SharePoint administrative framework, "SharedResourceProvider Name=SSP Parent=SPFarm Name=MOSS", could not be deleted because other objects depend on it. Update all of these dependants to point to null or different objects and retry this operation. The dependant objects are as follows: ProjectPSISharedApplicationTimerJob Name=Project Server Synchronizing Job for 'SSP' Parent=ProjectApplicationService Name=ProjectApplicationService”

RESOLUTION: ° Identify the GUID for the problem SSP. ° Use STSADM -o deleteconfigurationobject -id "id retrieved from object table" to remove these items from the configuration database.

Use the following procedure to identify the Shared Services GUID:

Login to SQL server. ° Open SQL Management Studio and expend Databases. ° Expand Configuration Database & Tables. ° Opened table for dbo.object. ° Executed following query in query analyzer: SELECT * FROM [MOSS_CFG_CA_01].[dbo].[Objects]where name like 'Name of the Shared Services'. ° Copy the ID of object referenced in objects table of configuration database. ° Open command prompt and changed directory to C:\Program Files\Common Files\Microsoft Shared\web server extensions\12\BIN> and executed following command to delete the Shared Services using the ID which was copied: Stsadm -o deleteconfigurationobject -id "id retrieved from object table"


Shared Services should be deleted from the Cenral Administration.

Wednesday, August 13, 2008

Step by Step Guide on Publishing InfoPath Forms to SharePoint Site.

1. Creating and Configuring Forms Library in SharePoint.
2. Configuring InfoPath Form 2007. 3. Configure Form Submit Options.
4. Publishing InfoPath Form to SharePoint 2007.
5. Adding the Published form as Content type to the Forms Library.

Note: There are 2 types of InfoPath Forms.
a) User Form:- Only fields to be entered, where there is no Active code or programming added to the Form. These forms can be directly published to SharePoint Site. To Publish this Form, the user should be an Owner or Administrator of the Site Collection.
b) Admin Form:- These Forms have .net coding or Programming with the code which should run in the background once the Form is submitted. These Forms should be uploaded on the Central Administration and Activated for the Web Application to be used with. To publish this Form, the user should be a Farm Administrator.
Creating and Configuring Forms Library in SharePoint.
1. Browse to the SharePoint site you need to create the Forms Library.
2. Click in Site Actions -> Create -> Select “Form Library” under Libraries Section.
3. Enter the Name and the Description for the Form, Click on “Create
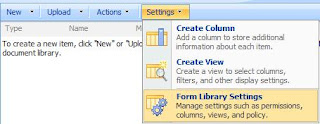
4. Once the Form Library is created -> Select Settings -> Form Library Settings
5. Select “Advanced Settings” .
6. Select “Yes” for Allow Management of Content Types.
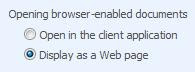
7. For “Browse-enabled Documents” -> Select “Display as Web Page”. This option is beneficial when users do not have InfoPath 2007 installed on their local machine. The Form will open in the browse if this option is selected.
8. Click Ok.


Configuring InfoPath Form 2007

1. Once the Form is Designed and Created, we have to perform some pre-requisite tasks to be able to successfully publish to the SharePoint Site.
2. From the Tasks pane -> Select “Design Checker


3. Select “Change Compatibility Settings”. Enter the data as in below screenshot.
Note:- The URL to be entered should be of the “Site Collection”. Not of a Subsite or Form Library URL. The user publishing this Form should be the Owner/Administrator of the Site Collection URL specified.

Note:- If you select “Backward Compatibility” option for Office 2003, some of the controls that are not support in InfoPath 2003 will not function as expected. Select it at your own risk. If you have configured the Form Library to open the Form as a Web Page, this option will not be required to be selected.
4. Click Ok.


Configuring Form Submit Options

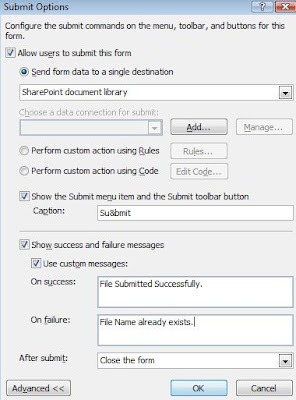
1. Select “Tools” Menu -> “Submit Options”. You will get the below dialog box.
2. After entering the details as required, click “Add” button for “Choose a data connection for Submit
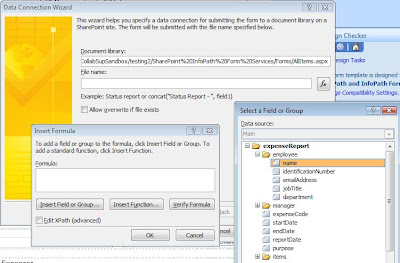
3. You will get “Data Connection Wizard” -> Copy the Form Library URL Link (created during 1st step) and paste it.
4. When you click on “fx” button you will get the “Insert Formula” dialog box. Click on “Insert Field or Group” button you will get “Select a Field or Group” dialog box.
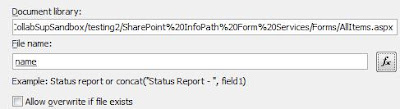
5. Select the Field, whose data should be taken as the file name, once the Form is submitted.
6. Select “Allow overwrite if file exists” as per your requirement and the data you will be entering in the Form. If you select this option you can also Enable Versioning on the library.
7. Click “Next”. Enter a Friendly name for the Data Connection. Click “Finish”. It will again come back to the Submit Options dialog box, Click OK.

Publishing InfoPath Form to SharePoint 2007.
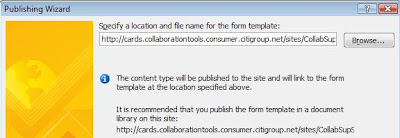
1. Click File Menu -> Publish. Publishing Wizard will open up.
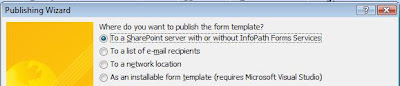
2. Select the option to publish to SharePoint server and click on “Next
3. Now again enter the URL of the “Site Collection” and click on “Next
4. Make sure that the Check box is selected as the screen shot. It is recommended to select “ Site Content Type (advanced)” to avoid manual creation of the content type. Click on “Next”.
Note:- The 3rd option “Administrator-approved Form Template (advanced)” is to be selected when the Form has Active code or any .net Programming added to the form.
5. Select “Create a new Content Type”, so that we don’t overwrite the default content type of SharePoint. Click on “Next
6. Enter a Friendly Name and Description for the Content Type. Click on “Next
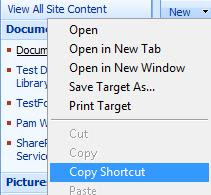
7. You will need the URL of a Document Library. You can copy the shortcut as shown in the screen shot. Then paste it in the Publishing Wizard and click on “Next

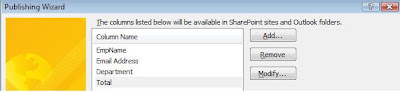
8. Add Columns to your Form Library. Click on “Next
9. At the end it will give the summary of the options selected and Click on “Publish” button. Once you get the Message “Your Form template was Published Successfully” Click on the “Close” button.

Adding the Published form as Content type to the Forms Library.
1. Browse to the Forms Library -> Select Settings -> Form Library Settings. You will Content Types as below. “Form” is the default content type. We have to add the new InfoPath Content type that got created while publishing the InfoPath form.
2. Click on “Add from existing site content Types”. From the drop down list select “Microsoft Office InfoPath”. Add the “Content Type”. Click on OK.
3. You will now see 2 Content types, the default (Form) and the one you just added. You can delete the default content type if required.

Now you can go ahead and create a New Form, the published Form should open up in Web browser.

Not able to Export Survey list with more than 100 responses to Excel Spreadsheet

Issue:- While Exporting a Survey List, only 100 responses are exported.

No Error is logged or generated.

Resolution:- Open the Sharepoint Survey List in Sharepoint Designer. For both Overview.aspx and Allitems.aspx do the following.

Change the RowLimit element Paged property set to FALSE.
RowLimit Paged="FALSE">100</RowLimit
Change the value to True (using SP Designer 2007), otherwise it will limit the items display and export to excel.
RowLimit Paged="TRUE">100</RowLimit

Thursday, July 31, 2008

Not able to Create a New Document in Document Library

Issue:- Not able to create a New Document in Document Library.

Error:- "The exception unknown software exception (0xc06d007f) occured in the application at location 0x7c812a5b."

Environment:- Office 2003 and Office 2007 product together.

Resolution:- http://support.microsoft.com/kb/938888

Wednesday, July 30, 2008

Export to Spreadsheet

Issue / Error:- “Cannot get the list Schema column property from the SharePoint List”
When does is occur? :– While exporting a list to Excel Spreadsheet.
Environment :- Office 2003
Resolution :- Known bug. Can be resolved by Post Service Pack 1 release http://support.microsoft.com/kb/941422/en-us

Workaround:-
Upgrade to office 2007 OR
a. Change all the Date columns in the List to use “Date Only” format.

b. Using a machine which has Office 2007 installed, Export the list to Spreadsheet.
c. Create a new Blank “Import Spreadsheet” List.
d. Import the old Exported List back.
e. Now you will be able to export the list to spreadsheet in Office 2003 also.

Note: Do not change the format back to “Date & Time”

How to Re-produce the issue?

1. Create a SharePoint List with “Date and Time” Column keeping the format as “Date Only”
2. On Office 2003 machine Export the list to Spreadsheet, it will work without any issues.
3. Change the Date Column Format to “Date & Time”
4. Now again try to export the list to spreadsheet, it will not work, you will get the error “Cannot get the list Schema column property from the SharePoint List”, but the same list will get exported without any issues in Office 2007 setup.

Note: Even if you change the Date format back to “Date Only”, the issue will still persist; it does not resolve the error.

Tuesday, May 20, 2008

Error while creating a new page in MOSS.

Getting the below error while creating a new page in Moss 2007 while using publishing or collaboration portal template.


List does not exist The page you selected contains a list that does not exist.

It may have been deleted by another user.


In ULS Logs the error listed is as below.

05/16/2008 13:13:34.51 w3wp.exe (0x1AF8) 0x148C Windows SharePoint Services General 8kh7 High List does not exist The page you selected contains a list that does not exist. It may have been deleted by another user. 05/16/2008 13:13:34.51 w3wp.exe (0x1AF8) 0x148C Windows SharePoint Services General 8nca Verbose Application error when access /_layouts/AccessDenied.aspx, Error=List does not exist The page you selected contains a list that does not exist. It may have been deleted by another user. at Microsoft.SharePoint.Library.SPRequestInternalClass.GetListsWithCallback(String bstrUrl, Guid foreignWebId, String bstrListInternalName, Int32 dwBaseType, Int32 dwBaseTypeAlt, Int32 dwServerTemplate, UInt32 dwGetListFlags, UInt32 dwListFilterFlags, Boolean bPrefetchMetaData, Boolean bSecurityTrimmed, Boolean bGetSecurityData, ISP2DSafeArrayWriter p2DWriter, Int32& plRecycleBinCount) at Microsoft.SharePoint.Library.SPRequest.GetListsWithCallback(String bstrUrl, Guid foreignWebId, String bstrListInternalName, Int32 dwBaseType, Int32 dwBaseTypeAlt, Int32 dwServerTemplate, UInt32 dwGetListFlags, UInt... 05/16/2008 13:13:34.51* w3wp.exe (0x1AF8) 0x148C Windows SharePoint Services General 8nca Verbose ...32 dwListFilterFlags, Boolean bPrefetchMetaData, Boolean bSecurityTrimmed, Boolean bGetSecurityData, ISP2DSafeArrayWriter p2DWriter, Int32& plRecycleBinCount) 05/16/2008 13:13:34.51 w3wp.exe (0x1AF8) 0x148C Windows SharePoint Services General 0 Verbose Releasing SPRequest with allocation Id {BD5F0900-38A4-40AB-BC1F-E78319A3DD70}


Resolution
=========
Go to Site Settings -> Master page Gallery -> Add Authenticated Users group and give Read Restricted Access rights.


Add the same group in Style Library and give the same permissions.

Sunday, February 24, 2008

Microsoft Search Server 2008

Search Server is one of the other major Enterprise servers of Microsoft which is growing Fast with Sharepoint 2007. With the new release of Search Server 2008 in March, it is expected to take Search functionality and Search Experience to the next level for Microsoft's Customer's.

There are better features than Google's Onebox Search Server Appliance, though I would say both have their own pro's and con's.

Search Server 2008
It's RTM version's are getting released in Express and Full Edition. Express Edition will be downloadable for free whereas Full version is a licensed product. There will be support provided for both these versions from Microsoft.

Express Edition's limitation is that it can be installed only on a SingleServer WSS 3.0 environment, whereas, Full Edition can be installed in a Farm WSS 3.0 enviroment.

Search Server 2008 MOSS patch is expected to be released later this year. When you install Search Server 2008, WSS 3.0 will be installed along with it, with some more cool features of Search which is not available with only WSS 3.0 Another new and cool feature of Search Server is the Federated Search which allows you to render the index of the Search engines on the internet, except for Google Search, Google blocks any search engine to crawl its content.

Search Server needs to get the results returned in XML formart to display those results in the Search query, for any Search engine that cannot return the results in XML format to Search Server, we have Federated Search custom connectors that can be created to re-format the results in XML format and store it locally. Those custom connectors is something that Shareopoint Developers will have to do. There are many 3rd party custom search connectors already available and can be used with Search Server 2008.

Google's Enterprise Search products have limitations of crawling data, depending on the product you buy, the limitations differ. In Microsoft Search Server 2008 there is no limitation to the no of files that be crawled. Also, Google's product expire in 2 years and so will their email support, they do not have any on call support. If you want to renew the support you will have to buy a new license for that to get support. (Email)

More information on the Installation and new features of Search Server 2008 will be posted soon.

Monday, February 11, 2008

Email Enabled Document Library [Error in Application]

'Error in Application' is the error we get when configuring Email Enabled Document library.

There is one most common scenario when you will get this error.

WSS 3.0 or MOSS 2007 installed as a Basic Installation [SINGLESERVER]

By Design when you install sharepoint using Basic intallation, the Central Admin site and any other new Web Apps that you create will use 'Network Service' as the service account for the Application Pools in IIS. For a contact to be created for a Document Library, the Application Pools of both Central Admin and the Web App should be using a domain user account and not Network Service.

Steps to Perform to resolve this error.

1. Create a Service Account in Active Directory who is also a member of the Domain Admins group. Delegate all rights to this service account to the Organizational Unit created for Sharepoint, where contacts will be created.

2. On the Sharepoint server, Open Computer Management -> Local Groups and Users -> Groups. you will find 3 WSS_WPG groups, make the service account a member of all these 3 groups and also the member of the IIS_WPG group.

3. On the Sharepoint server, open IIS console and make sure that the Application pools running for Central Admin site and the Web Application are running using the service account created in step 1. Perform an IISRESET and then make sure the Central Admin and the website are up and running after changing the Application Pools.

4. Now configure the Incoming Email settings for the Document Library. You should not get the 'Error in Application' error.

5. Now create a new Web Application and a Site Collection using the service account and not 'Network Service'. Take a backup of the old Site Collection using stsadm -o backup command and restore that backup on the new one just created using stsadm -o restore

Note: We have to do the 5th step because once changing the service accounts in many cases the site will not open from Client machines, it will open only on the Server or after configuring the Incoming email settings for the Doc Library, the emails will not be visible in the document library.

These above steps will resolve the issue and also the sites up and running. In many cases where the installation is not Basic, you will find the same error message, that purely due to the service account not being a member of the 'Domain Admins' group.

Thursday, January 10, 2008

Search Does not work with Basic Authentication, only WSS 3.0

WSS 3.0 Only with Basic Authentication to Search the Sites

Only WSS 3.0 is installed and Basic Authentication is configured so that while logging to the site domain\username and password is not required, only username and password should work.


But by design Search in WSS 3.0 with Basic Authentication will not work. So there is a work around for the same which can be followed by using the following article.


http://technet2.microsoft.com/windowsserver/WSS/en/library/8208d71e-7c41-4845-bc06-95429de02cf11033.mspx?mfr=true

But this above article is misleading many times as every network has various scenarios.

Step by Step to configure this setup

1. Open Central Administration Site ->Application Management -> Create or Extend Web Application -> Extend an Existing Web Application.

a. Select the main Web application
b. In IIS Web Site select ‘Create a new IIS Website’
c. Give port no. 81 or any random port you want.
d. Enter a hostheader if desired.
e. Select NTLM as Authentication Provider.
f. In Load Balanced URL select ‘Intranet’ Zone. Click on OK.

2. In Central Administration -> Application Management -> Authentication Providers.

a. You will see the Default Zone and the Intranet Zone where we extended the new site.
b. Click on Default zone; make sure that only Basic Authentiation is selected. Click on OK.
c. Click on Intranet zone; make sure that Windows Integrated is selected. Click on OK.

3. Open IIS console -> Web Sites.

a. Go to the properties of the Main site -> Directory Security
b. Click Edit in Authentication and access control.
c. You should see only ‘Basic Authentication’ selected over there.
d. In Default Domain type \ (backslash)
e. Click on OK. Click on OK.

4. Open Central Administration -> Operations -> Alternate Access Mappings -> Select the Main Web Application.

a. You will see 2 zones having URL’s specified. In default zone your primary URL. In Intranet zone the URL and port no. which you extended the main site with.
b. We have to now swap these 2 zone URL’s Put the Default URL in the Intranet zone and the Intranet zone URL in the Default zone.

5. Perform an IISRESET.

6. Check the Eventviewer App Log and verify that we should NOT get the event id 2436 gatherer which is a warning. This warning will come after every 5 mins if Search will not work, otherwise it will not come.

We have to swap the URL’s in AAM purely because Search always renders the page which is mentioned in the Default Zone and then crawls it. After the Swap of the URL’s in AAM, as the default zone URL will be of Windows Integrated, Search will be able to render it, crawl and we will be able to see the search results after 5 mins. In App log you will stop seeing event id 2436 warning and event ID 10044 information event which means that search should work fine.

Wednesday, January 9, 2008

Installation Windows Sharepoint Services [WSS] 3.0

Installing Only WSS 3.0


Windows Sharepoint Services 3.0 Installation is farely easy but very complicated to resolve if it errors out. There are 2 types of Installations which are described in detail below. WSS 3.0 is freely downloadable from Microsoft site. [ http://www.microsoft.com/downloads/details.aspx?FamilyID=d51730b5-48fc-4ca2-b454-8dc2caf93951&DisplayLang=en ]


Pre-requisites before Installing Windows Sharepoint Services.

  1. Windows 2003 OS with ASP.net + IIS 6.0. SMTP is required if you are deciding to use Email Enabled Document Libraries, not otherwise.
  2. Service Pack 1 or higher.
  3. ASP.net 3.0 framework.
  4. Service account created in Active Directory, recommended to be a member of Domain Admins groups. This service account should not change the password according to group policies, otherwise everytime the password is required to change, Sharepoint sites will go down once the password is changed. If you dont want the Service account to be a member of Domain Admins group, it has to be the member of the local administrators group on the server you will be installing Sharepoint.

Types of Installation of WSS 3.0

  1. Basic
  2. Advanced

Basic Installation Detail Description

  1. You run the sharepoint.exe file which you can download from the above link. You will get the License agreement page. Accept it and Click on Next.
  2. On next Page It will give you 2 buttons 'Basic' and 'Advanced'. We are going to select 'Basic'
  3. After selecting Basic it will continue with the installation process and at the end it will stop at 'Run the Sharepoint Products and Technologies Configuration Wizard now'. This is inshort referred as 'PSConfig' wizard.
  4. Make sure that the checkbox is selected and click on the Close button. PSConfig Wizard will start.
  5. Click on Next, it will give a warning of restartint the IIS Services -> click on Yes. It will run 1 to 10 steps in PSConfig wizard.
  6. Once all the steps are completed Click on the Finish button and default page http://servername/ site will open automatically.


Description of above steps

  1. Step 1:- Log on to the server using the Service account created. If the pre-requisites of IIS and ASP.net 3.0 framework is not met, it will error out and you will not get the EULA page. Before coming to the EULA page, pre-requisites are checked.
  2. Step 2:- Basic Installation will not prompt for any configuration settings. Using Basic installation SQL Express Edition is installed and Sharepoint Databases are created in SQL Express Edition. By Default there is not GUI mode to manage those databases, you will have to separately install SQL Management Studio Express [ http://www.microsoft.com/downloads/details.aspx?FamilyID=c243a5ae-4bd1-4e3d-94b8-5a0f62bf7796&DisplayLang=en ] and once installed connect to the database using "\\.\pipe\MSSQL$MICROSOFT##SSEE\sql\query" (without quotes).
    In this step only the binaries and some registry keys are installed and configured.

    Binary files are located at C:\Program Files\Common Files\Microsoft Shared\Web Server Extensions\12\Bin

    SQL Express Databases .mdf and .ldf files are located at C:\Windows\SYSMSI\SSEE\MSSQL.2005\MSSQL\Data

    Registry Key location is HKEY_LOCAL_MACHINE\SOFTWARE\Microsoft\Shared Tools\Web Server Extensions\12.0\WSS. Important Registry keys are 'Server Role' and 'Setup Type'. If Basic Installation is done, "Server Role" will be mentioned as "SINGLESERVER" and "Setup Type" will be mentioned as "CLEAN_INSTALL"
  3. Step 3:- PSConfig wizard is when Sharepoint is Basically configured. Untill you run this wizard, Sharepoint Administration site or any functionality related to Sharepoint will not be possible. Description of the PSConfig Steps, I will Post it Separately.

Once the Installation and PSConfig Config wizard is completed successfully, Open up IIS console and you will find that the 'Default Web Site' will be stopped and the default Sharepoint Site created is also at port 80 [ Sharepoint - 80 ]. So if you have Exchang running on the same server, OWA will stop working as OWA is extended on the 'Default Web Site' in IIS. Exchange and WSS 3.0 only is supported by Microsoft but Exchange and MOSS 2007 on the same server is not Supported.

You will also find the Sharepoint Central Administration V3 site, which is the Sharepoint Central Administration Site IIS Virtual site. This Site will be created at a random port no. which will be taken during PSConfig wizard. From the above registy path, you can also get the 'CentralAdministrationURL' which specifies the Central Admin site URL with the Port no.

There will be 3 Default groups created 'WSS_WPG', 'WSS_RESTRICTED_WPG', 'WSS_ADMIN_WPG'. The user account using which you installed Sharepoint will be the member of these groups by default. It is recommended you log-on to the server as the service account first and then proceed with the Installation.

By Default at the database location you will find 4 Sharepoint Databases created in Basic Installation.

1. Sharepoint_Config_bigGUID [ Sharepoint Farm's Configuration database].
2. Sharepoint_AdminContent_bigGUID [ Sharepoint Central Administration database].
3. WSS_CONTENT [ Sharepoint - 80 sites database].
4. WSS_Search [ Windows Sharepoint Search Service Database, By default Search Service will be started in Basic Installation.]

Total Pageviews