Environment :- Only Vista Machines.
Note :- Before making any registry changes, take Reg back up
Resolution :- Delete the follow registry keys and reboot is a MUST
HKEY_CLASSES_ROOT\CLSID\{E88DCCE0-B7B3-11D1-A9F0-00AA0060FA31}
HKEY_CLASSES_ROOT\CLSID\{0CD7A5C0-9F37-11CE-AE65-08002B2E1262}
Thursday, December 18, 2008


Thursday, December 11, 2008
Files opens as Read Only after Check-out
Note:- Please take precautionary steps before applying the below steps. Backup your registry.
Issue:- Files will open as Read-Only after checking Out a document in SharePoint and trying to Edit it.
Environment:- XP + Office 2003 or Vista + Office 2007
Follow the below steps to resolve the issue.
---------------------------------------------------
1.) Search for oledb32.dll on the workstation and make sure it exists in this location. The default location is c:\program files\common files\system\ole db\oledb32.dll
2) Copy and paste the information below to Notepad and save as a .reg file. This will correct the entries in the Registry that are probably missing.
===========================================================
REGEDIT4
[HKEY_CLASSES_ROOT\CLSID\{FF151822-B0BF-11D1-A80D-000000000000}]@="Microsoft OLE DB Root Binder for Internet Publishing"
[HKEY_CLASSES_ROOT\CLSID\{FF151822-B0BF-11D1-A80D-000000000000}\InprocServer32]@="C:\\Program Files\\Common Files\\system\\ole db\\oledb32.dll""ThreadingModel"="Both"
[HKEY_CLASSES_ROOT\CLSID\{FF151822-B0BF-11D1-A80D-000000000000}\OLE DB Binder]@="Microsoft OLE DB Root Binder"
[HKEY_CLASSES_ROOT\CLSID\{FF151822-B0BF-11D1-A80D-000000000000}\ProgID]@="MSDAURL.Binder.1"
[HKEY_CLASSES_ROOT\CLSID\{FF151822-B0BF-11D1-A80D-000000000000}\VersionIndependentProgID]@="MSDAURL.Binder"
[HKEY_CLASSES_ROOT\MSDAURL.Binder.1]@="Microsoft OLE DB Root Binder for Internet Publishing"
[HKEY_CLASSES_ROOT\MSDAURL.Binder.1\CLSID]@="{FF151822-B0BF-11D1-A80D-000000000000}"
[HKEY_CLASSES_ROOT\MSDAURL.Binder]@="Microsoft OLE DB Root Binder for Internet Publishing"
[HKEY_CLASSES_ROOT\MSDAURL.Binder\CLSID]@="{FF151822-B0BF-11D1-A80D-000000000000}"
[HKEY_CLASSES_ROOT\MSDAURL.Binder\CurVer]@="MSDAURL.Binder.1"
===========================================================
3) From Start->Run, type Regsvr32.exe "[Drive]:\Program Files\Common Files\System\OLE DB\MSDAIPP.DLL"
4) Test and see if the issue is resolved.
Issue:- Files will open as Read-Only after checking Out a document in SharePoint and trying to Edit it.
Environment:- XP + Office 2003 or Vista + Office 2007
Follow the below steps to resolve the issue.
---------------------------------------------------
1.) Search for oledb32.dll on the workstation and make sure it exists in this location. The default location is c:\program files\common files\system\ole db\oledb32.dll
2) Copy and paste the information below to Notepad and save as a .reg file. This will correct the entries in the Registry that are probably missing.
===========================================================
REGEDIT4
[HKEY_CLASSES_ROOT\CLSID\{FF151822-B0BF-11D1-A80D-000000000000}]@="Microsoft OLE DB Root Binder for Internet Publishing"
[HKEY_CLASSES_ROOT\CLSID\{FF151822-B0BF-11D1-A80D-000000000000}\InprocServer32]@="C:\\Program Files\\Common Files\\system\\ole db\\oledb32.dll""ThreadingModel"="Both"
[HKEY_CLASSES_ROOT\CLSID\{FF151822-B0BF-11D1-A80D-000000000000}\OLE DB Binder]@="Microsoft OLE DB Root Binder"
[HKEY_CLASSES_ROOT\CLSID\{FF151822-B0BF-11D1-A80D-000000000000}\ProgID]@="MSDAURL.Binder.1"
[HKEY_CLASSES_ROOT\CLSID\{FF151822-B0BF-11D1-A80D-000000000000}\VersionIndependentProgID]@="MSDAURL.Binder"
[HKEY_CLASSES_ROOT\MSDAURL.Binder.1]@="Microsoft OLE DB Root Binder for Internet Publishing"
[HKEY_CLASSES_ROOT\MSDAURL.Binder.1\CLSID]@="{FF151822-B0BF-11D1-A80D-000000000000}"
[HKEY_CLASSES_ROOT\MSDAURL.Binder]@="Microsoft OLE DB Root Binder for Internet Publishing"
[HKEY_CLASSES_ROOT\MSDAURL.Binder\CLSID]@="{FF151822-B0BF-11D1-A80D-000000000000}"
[HKEY_CLASSES_ROOT\MSDAURL.Binder\CurVer]@="MSDAURL.Binder.1"
===========================================================
3) From Start->Run, type Regsvr32.exe "[Drive]:\Program Files\Common Files\System\OLE DB\MSDAIPP.DLL"
4) Test and see if the issue is resolved.
Thursday, December 4, 2008
Windows SharePoint Services Search (SPSearch) Errors File Not Found / 'start' action failed
Disclaimer: Take all possible backups, Since you have decided to troubleshoot on your own we hold no responsibility if anything goes wrong.
Note: After every troubleshooting step run following command
stsadm -o spsearch -action fullcrawlstart
& monitor Eventviewer>Application log for Success or Failures related to Windows SharePoint Services Search Service
On Failures try next step.
1. Open a Command prompt
Browse to C:\Program Files\Common Files\Microsoft Shared\web server extensions\12\BIN
stsadm -o provisionservice -action stop -servicetype "Microsoft.SharePoint.Search.Administration.SPSearchService, Microsoft.SharePoint.Search, Version=12.0.0.0, Culture=neutral, PublicKeyToken=71e9bce111e9429c" -servicename "SPSearch"stsadm -o provisionservice -action start -servicetype "Microsoft.SharePoint.Search.Administration.SPSearchService, Microsoft.SharePoint.Search, Version=12.0.0.0, Culture=neutral, PublicKeyToken=71e9bce111e9429c" -servicename "SPSearch"
stsadm -o spsearch -action stop
From SQL Server Management Studio backup & remove Old WSS_Search databases
stsadm -o spsearch -action start -farmserviceaccount [Domain\user]-farmservicepassword [Password] -databaseserver [SQL Server\Instance] -databasename [New WSS_Search DatabaseName]
Note: Replace above parameters with proper values
2. Run following from command prompt Before Reboot
net stop sptimerv3
net stop spsearch
sc config sptimerv3 start= disabled
sc config spsearch start= disabled
Run following from command prompt After Reboot
sc config spsearch start= demand
sc config sptimerv3 start= auto
net start sptimerv3
net start spsearch
3. From Windows Explorer go to backup cache.ini file from following location
C:\Documents and Settings\All Users\Application Data\ Microsoft\ SharePoint\ Config\
Change the contents of cache.ini to 1
From command promptnet stop spsearch net start spsearchstsadm -o execadmsvcjobs
4. psconfig -cmd secureresources
attrib -s %windir%\tasks.
Go to Properties of windows\tasks folder and add wss_wpg and wss_admin_wpg groups and give the full control permissions.
5. Repair MOSS from Add/Remove programs
Reboot server
Run PSCONFIG without changing any settings
NOTE: Do not perform following step if you want to use Network Service as SharePoint Service Account on SingleServer Installation with SQL Internal Engine
6. Central Admin>Operations>Servers in Farm
Note down the Configuration Database name
Run PSCONFIG Disconnect from Configuration Database
Run PSCONFIG Reconnect to same Configuration Database disconnected above.
Note: After every troubleshooting step run following command
stsadm -o spsearch -action fullcrawlstart
& monitor Eventviewer>Application log for Success or Failures related to Windows SharePoint Services Search Service
On Failures try next step.
1. Open a Command prompt
Browse to C:\Program Files\Common Files\Microsoft Shared\web server extensions\12\BIN
stsadm -o provisionservice -action stop -servicetype "Microsoft.SharePoint.Search.Administration.SPSearchService, Microsoft.SharePoint.Search, Version=12.0.0.0, Culture=neutral, PublicKeyToken=71e9bce111e9429c" -servicename "SPSearch"stsadm -o provisionservice -action start -servicetype "Microsoft.SharePoint.Search.Administration.SPSearchService, Microsoft.SharePoint.Search, Version=12.0.0.0, Culture=neutral, PublicKeyToken=71e9bce111e9429c" -servicename "SPSearch"
stsadm -o spsearch -action stop
From SQL Server Management Studio backup & remove Old WSS_Search databases
stsadm -o spsearch -action start -farmserviceaccount [Domain\user]
Note: Replace above parameters with proper values
2. Run following from command prompt Before Reboot
net stop sptimerv3
net stop spsearch
sc config sptimerv3 start= disabled
sc config spsearch start= disabled
Run following from command prompt After Reboot
sc config spsearch start= demand
sc config sptimerv3 start= auto
net start sptimerv3
net start spsearch
3. From Windows Explorer go to backup cache.ini file from following location
C:\Documents and Settings\All Users\Application Data\ Microsoft\ SharePoint\ Config\
Change the contents of cache.ini to 1
From command promptnet stop spsearch net start spsearchstsadm -o execadmsvcjobs
4. psconfig -cmd secureresources
attrib -s %windir%\tasks.
Go to Properties of windows\tasks folder and add wss_wpg and wss_admin_wpg groups and give the full control permissions.
5. Repair MOSS from Add/Remove programs
Reboot server
Run PSCONFIG without changing any settings
NOTE: Do not perform following step if you want to use Network Service as SharePoint Service Account on SingleServer Installation with SQL Internal Engine
6. Central Admin>Operations>Servers in Farm
Note down the Configuration Database name
Run PSCONFIG Disconnect from Configuration Database
Run PSCONFIG Reconnect to same Configuration Database disconnected above.
Friday, October 24, 2008
Workflow "Error" System Account An error has occurred after workflow completed MOSS 2007
Problem: If you have a "built in" or custom approval workflow setup for your document library. The workflow runs correctly, however when sometimes you look at the workflow status, you may receive an error after the task has been approved and completed such as, Event Type: Error User ID: System Account Description: An error has occurred in [name of workflow].
Resolution: When you define your workflow, there is a section "Post-completion Workflow Activities", where you can check "Update the approval status (use this workflow to control content approval)". If you check this option, and you do NOT have content approval enabled on the library level, you get the system account error message. If you do not check it, everything works fine.
Reason for occurrences: The account listed in the "User ID" column does not have permission to "something" that is being requested in the workflow code. Workflow usually running as the "system account" within SharePoint and should have access to all the objects within SharePoint. However, the system account may not have access to some resources that are outside of SharePoint and needed by the workflow code. Accessing outside resources is usually done via the .NET worker process account (e.g. NETWORK SERVICE).
Tuesday, October 14, 2008
Move WSS3.0 databases from one SQL Server to another?
How to move WSS3.0 databases from one SQL Server to another?
Configuration:
WSS3.0 Server
Source SQL Server: Win 2003 Server SP2 SQL Server 2000 + SP4
Destination SQL Server: Win 2003 Server SP2 SQL Server 2000 + SP4
STEP1: BACKUP:
1] On Source SQL Server: Backup SharePoint Content databases.
Open SQL Server Enterprise manger
Right Click a database (For ex: WSS_Content)>All Tasks>Backup Database>Database Complete>Backup to disk>Add>Filename>Provide a path & filename>Ok>Ok
Repeat above procedure for all SharePoint databases however we will not restore all of them.
(Do not restore COnfiguraion & WSS_AdminContent... database on new SQL Server)
How to find name of Content databases:
Central Admin>Application Management>Content databases>Select web application from Right Hand Side Top drop down list
Database name will be displayed
-------------
2] On SharePoint Server: Take screenshots of all configured setting on Central administration page
For example:
Central Admin>Operations>Global Configuration>Alternate access mappings
Central Admin>Operations>Outgoing email settings
Central admin>Application management>Define managed paths
etc.
--------------
STEP 2: PREPARE DESTINATION SQL SERVER
We must install either same or Better version than Source SQL Server
Open SQL Server Enterprise manger
Security>Logins>Right Click>New Login
Add SharePoint Service Account in Domain\user format
This account must be either Domain admin or Domain user with Local admin rights on SharePoint server.
Security>Logins>Right Click Service Account>Properties>Server Roles Tab
Check Security Administrators & Database Creators
Click Ok
STEP 3: RESTORE CONTENT DATABASE TO DESTINATION SERVER
Copy backup Content database files to Destination SQL Server
Open SQL Server Enterprise manger
Databases>Right Click>All Tasks>Restore database>Restore as Database>Type name of Content Database>From device>Select device>disk>Add>Browse to backup files>Ok>Ok
Similarly restore all Content databases from backup
Security>Logins>Service Account>Database Access Tab>In upper pane select Content database>In lower pane check DB_OWNER checkbox>Click Ok
STEP 4: DISCONNECT FROM SOURCE SQL SERVER
On WSS3.0 Server
Run SharePoint Products and Technologies Configuration (PSCONFIG ) Wizard
-Select Disconnect from this server farm
-We should get configuration successful message.
STEP 5: CONNECT TO DESTINATION SQL SERVER
Run SharePoint Products and Technologies Configuration (PSCONFIG ) Wizard
-Select No, I want to create a new server farm
-Database Server: Give Destination SQL Server name
-Database Name: Type new Config Database Name
-Username: Use same Service account as used in existing old server
-Password: Password for that account
-We should get configuration successful message.
-After PSCONFIG finishes successfully Central admin page will open automatically.
STEP 6: RESTORING SITES FROM DATABASES
3.Create a new web application http://app on port 80 with content database name WSS_Content_TEST
1] Go to V3 Central Administration Page>Application Management>Create or extend Web Application
2] Click on Create a new web application
3] Choose any unused port no
4] Enter Database Server Name and enter Database name as WSS_Content_TEST
7] Wait for operation to complete
8]After application is created create a site collection
9] Fill the details and select Team site template click Ok
11] Browse to test site http://app
12] Check if it is working
To remove dummy_content_db from a web application
1] Click on Content Databases
2] On right hand side select the newly created web application if not already present
3] Click on Database name WSS_Content_TEST
4] Check remove content database checkbox and click OK
To attach restored content database to a new web application:
Open a command prompt and browse to
c:\Program Files\Common Files\Microsoft Shared\Web Server Extensions\12\Bin>
Run following command
stsadm -o addcontentdb -url-databaseserver -databasename
Now browse to http://app and check if it is working
Similarly add content databases for other web applications.
STEP 7: POST MIGRATION TASKS
From the screenshots taken earlier we need to reconfigure central admin.
If site was using SSL we need to reapply it & change AAM.
We need to redo any customizations if lost after creating new configuration database.
If 3rd party web parts stop working we need to reinstall them.
Integration with other products needs to be reconfigured.
We need to assign the indexer to the sites from Central Admin>Application Management>Content databases>Select web application from Right Hand Side Top drop down list>Click on Database name>Select Search server from drop down list>Click Ok
Use "stsadm -o spsearch -action fullcrawlstart" to force instant crawling of sites.
NOTE:
=====
Do NOT discard Source SQL Server & Databases until the functionality of New SQL Server & WSS3.0 is tested & confirmed.
There are alternatives to above procedure but are quite tricky. :-)
Configuration:
WSS3.0 Server
Source SQL Server: Win 2003 Server SP2 SQL Server 2000 + SP4
Destination SQL Server: Win 2003 Server SP2 SQL Server 2000 + SP4
STEP1: BACKUP:
1] On Source SQL Server: Backup SharePoint Content databases.
Open SQL Server Enterprise manger
Right Click a database (For ex: WSS_Content)>All Tasks>Backup Database>Database Complete>Backup to disk>Add>Filename>Provide a path & filename>Ok>Ok
Repeat above procedure for all SharePoint databases however we will not restore all of them.
(Do not restore COnfiguraion & WSS_AdminContent... database on new SQL Server)
How to find name of Content databases:
Central Admin>Application Management>Content databases>Select web application from Right Hand Side Top drop down list
Database name will be displayed
-------------
2] On SharePoint Server: Take screenshots of all configured setting on Central administration page
For example:
Central Admin>Operations>Global Configuration>Alternate access mappings
Central Admin>Operations>Outgoing email settings
Central admin>Application management>Define managed paths
etc.
--------------
STEP 2: PREPARE DESTINATION SQL SERVER
We must install either same or Better version than Source SQL Server
Open SQL Server Enterprise manger
Security>Logins>Right Click>New Login
Add SharePoint Service Account in Domain\user format
This account must be either Domain admin or Domain user with Local admin rights on SharePoint server.
Security>Logins>Right Click Service Account>Properties>Server Roles Tab
Check Security Administrators & Database Creators
Click Ok
STEP 3: RESTORE CONTENT DATABASE TO DESTINATION SERVER
Copy backup Content database files to Destination SQL Server
Open SQL Server Enterprise manger
Databases>Right Click>All Tasks>Restore database>Restore as Database>Type name of Content Database>From device>Select device>disk>Add>Browse to backup files>Ok>Ok
Similarly restore all Content databases from backup
Security>Logins>Service Account>Database Access Tab>In upper pane select Content database>In lower pane check DB_OWNER checkbox>Click Ok
STEP 4: DISCONNECT FROM SOURCE SQL SERVER
On WSS3.0 Server
Run SharePoint Products and Technologies Configuration (PSCONFIG ) Wizard
-Select Disconnect from this server farm
-We should get configuration successful message.
STEP 5: CONNECT TO DESTINATION SQL SERVER
Run SharePoint Products and Technologies Configuration (PSCONFIG ) Wizard
-Select No, I want to create a new server farm
-Database Server: Give Destination SQL Server name
-Database Name: Type new Config Database Name
-Username: Use same Service account as used in existing old server
-Password: Password for that account
-We should get configuration successful message.
-After PSCONFIG finishes successfully Central admin page will open automatically.
STEP 6: RESTORING SITES FROM DATABASES
3.Create a new web application http://app on port 80 with content database name WSS_Content_TEST
1] Go to V3 Central Administration Page>Application Management>Create or extend Web Application
2] Click on Create a new web application
3] Choose any unused port no
4] Enter Database Server Name and enter Database name as WSS_Content_TEST
7] Wait for operation to complete
8]After application is created create a site collection
9] Fill the details and select Team site template click Ok
11] Browse to test site http://app
12] Check if it is working
To remove dummy_content_db from a web application
1] Click on Content Databases
2] On right hand side select the newly created web application if not already present
3] Click on Database name WSS_Content_TEST
4] Check remove content database checkbox and click OK
To attach restored content database to a new web application:
Open a command prompt and browse to
c:\Program Files\Common Files\Microsoft Shared\Web Server Extensions\12\Bin>
Run following command
stsadm -o addcontentdb -url
Now browse to http://app and check if it is working
Similarly add content databases for other web applications.
STEP 7: POST MIGRATION TASKS
From the screenshots taken earlier we need to reconfigure central admin.
If site was using SSL we need to reapply it & change AAM.
We need to redo any customizations if lost after creating new configuration database.
If 3rd party web parts stop working we need to reinstall them.
Integration with other products needs to be reconfigured.
We need to assign the indexer to the sites from Central Admin>Application Management>Content databases>Select web application from Right Hand Side Top drop down list>Click on Database name>Select Search server from drop down list>Click Ok
Use "stsadm -o spsearch -action fullcrawlstart" to force instant crawling of sites.
NOTE:
=====
Do NOT discard Source SQL Server & Databases until the functionality of New SQL Server & WSS3.0 is tested & confirmed.
There are alternatives to above procedure but are quite tricky. :-)
Wednesday, October 8, 2008
500 Internal Error
Error:- 500 Internal Error
Description:- This error comes only for subsites and subsite administrators can browse the subsite without any issues. The parent site collection is also browsable without any issues. Only member or visitors of the subsite get the error "500 Internal Error"
Resolution:
1. Go to the subsite settings page by adding /_layouts/settings.aspx at the end.
2. Select Advanced permissions -> Settings -> Permissions Level
3. Click "Edit Permissions level"
4. Click "Inherit Permissions from parent"
Now the subsite should be browsable by all without any issues.
Description:- This error comes only for subsites and subsite administrators can browse the subsite without any issues. The parent site collection is also browsable without any issues. Only member or visitors of the subsite get the error "500 Internal Error"
Resolution:
1. Go to the subsite settings page by adding /_layouts/settings.aspx at the end.
2. Select Advanced permissions -> Settings -> Permissions Level
3. Click "Edit Permissions level"
4. Click "Inherit Permissions from parent"
Now the subsite should be browsable by all without any issues.
Friday, August 15, 2008
Unable to delete Shared Services
DESCRIPTION: Unable to Delete Shared Services when it's database is deleted from SQL server.
SYMPTOMS: Unable to delete Shared Services. There are still some objects which are dependent on configuration database and on project serve, due to which users are unable to delete SSP. Manually deleting of SSP using stsadm -o deletessp -title "ssp_name" command also shows same error.
ERROR MESSAGE: “An object in the SharePoint administrative framework, "SharedResourceProvider Name=SSP Parent=SPFarm Name=MOSS", could not be deleted because other objects depend on it. Update all of these dependants to point to null or different objects and retry this operation. The dependant objects are as follows: ProjectPSISharedApplicationTimerJob Name=Project Server Synchronizing Job for 'SSP' Parent=ProjectApplicationService Name=ProjectApplicationService”
RESOLUTION: ° Identify the GUID for the problem SSP. ° Use STSADM -o deleteconfigurationobject -id "id retrieved from object table"
Use the following procedure to identify the Shared Services GUID:
Login to SQL server. ° Open SQL Management Studio and expend Databases. ° Expand Configuration Database & Tables. ° Opened table for dbo.object. ° Executed following query in query analyzer: SELECT * FROM [MOSS_CFG_CA_01].[dbo].[Objects]where name like 'Name of the Shared Services'. ° Copy the ID of object referenced in objects table of configuration database. ° Open command prompt and changed directory to C:\Program Files\Common Files\Microsoft Shared\web server extensions\12\BIN> and executed following command to delete the Shared Services using the ID which was copied: Stsadm -o deleteconfigurationobject -id "id retrieved from object table"
Shared Services should be deleted from the Cenral Administration.
Wednesday, August 13, 2008
Step by Step Guide on Publishing InfoPath Forms to SharePoint Site.
1. Creating and Configuring Forms Library in SharePoint.
2. Configuring InfoPath Form 2007. 3. Configure Form Submit Options.
4. Publishing InfoPath Form to SharePoint 2007.
5. Adding the Published form as Content type to the Forms Library.
Note: There are 2 types of InfoPath Forms.
a) User Form:- Only fields to be entered, where there is no Active code or programming added to the Form. These forms can be directly published to SharePoint Site. To Publish this Form, the user should be an Owner or Administrator of the Site Collection.
b) Admin Form:- These Forms have .net coding or Programming with the code which should run in the background once the Form is submitted. These Forms should be uploaded on the Central Administration and Activated for the Web Application to be used with. To publish this Form, the user should be a Farm Administrator.
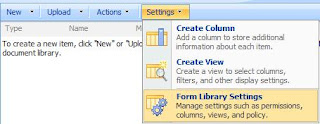 5. Select “Advanced Settings” .
6. Select “Yes” for Allow Management of Content Types.
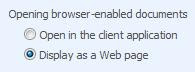
 7. For “Browse-enabled Documents” -> Select “Display as Web Page”. This option is beneficial when users do not have InfoPath 2007 installed on their local machine. The Form will open in the browse if this option is selected.
 8. Click Ok.
2. From the Tasks pane -> Select “Design Checker”
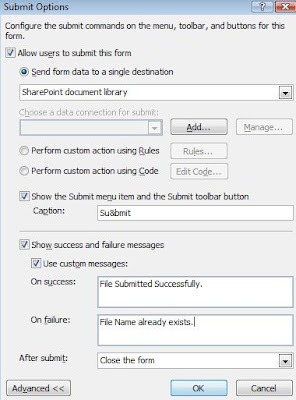 2. After entering the details as required, click “Add” button for “Choose a data connection for Submit”
3. You will get “Data Connection Wizard” -> Copy the Form Library URL Link (created during 1st step) and paste it.
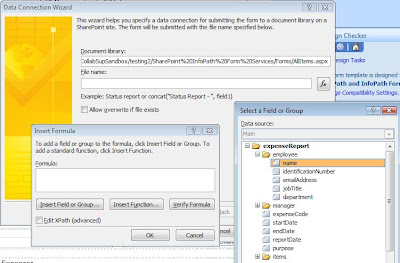 4. When you click on “fx” button you will get the “Insert Formula” dialog box. Click on “Insert Field or Group” button you will get “Select a Field or Group” dialog box.
5. Select the Field, whose data should be taken as the file name, once the Form is submitted.
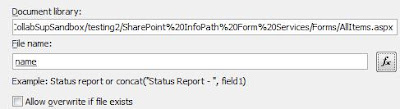 6. Select “Allow overwrite if file exists” as per your requirement and the data you will be entering in the Form. If you select this option you can also Enable Versioning on the library.
7. Click “Next”. Enter a Friendly name for the Data Connection. Click “Finish”. It will again come back to the Submit Options dialog box, Click OK.
Adding the Published form as Content type to the Forms Library.
2. Configuring InfoPath Form 2007. 3. Configure Form Submit Options.
4. Publishing InfoPath Form to SharePoint 2007.
5. Adding the Published form as Content type to the Forms Library.
Note: There are 2 types of InfoPath Forms.
a) User Form:- Only fields to be entered, where there is no Active code or programming added to the Form. These forms can be directly published to SharePoint Site. To Publish this Form, the user should be an Owner or Administrator of the Site Collection.
b) Admin Form:- These Forms have .net coding or Programming with the code which should run in the background once the Form is submitted. These Forms should be uploaded on the Central Administration and Activated for the Web Application to be used with. To publish this Form, the user should be a Farm Administrator.
Creating and Configuring Forms Library in SharePoint.
1. Browse to the SharePoint site you need to create the Forms Library.
2. Click in Site Actions -> Create -> Select “Form Library” under Libraries Section.
3. Enter the Name and the Description for the Form, Click on “Create”
4. Once the Form Library is created -> Select Settings -> Form Library Settings
2. Click in Site Actions -> Create -> Select “Form Library” under Libraries Section.
3. Enter the Name and the Description for the Form, Click on “Create”
4. Once the Form Library is created -> Select Settings -> Form Library Settings
5. Select “Advanced Settings” .6. Select “Yes” for Allow Management of Content Types.
7. For “Browse-enabled Documents” -> Select “Display as Web Page”. This option is beneficial when users do not have InfoPath 2007 installed on their local machine. The Form will open in the browse if this option is selected.8. Click Ok.
Configuring InfoPath Form 2007
2. From the Tasks pane -> Select “Design Checker”
 3. Select “Change Compatibility Settings”. Enter the data as in below screenshot.
 Note:- The URL to be entered should be of the “Site Collection”. Not of a Subsite or Form Library URL. The user publishing this Form should be the Owner/Administrator of the Site Collection URL specified.
Note:- If you select “Backward Compatibility” option for Office 2003, some of the controls that are not support in InfoPath 2003 will not function as expected. Select it at your own risk. If you have configured the Form Library to open the Form as a Web Page, this option will not be required to be selected.
4. Click Ok.
Configuring Form Submit Options
1. Select “Tools” Menu -> “Submit Options”. You will get the below dialog box.
2. After entering the details as required, click “Add” button for “Choose a data connection for Submit”3. You will get “Data Connection Wizard” -> Copy the Form Library URL Link (created during 1st step) and paste it.
4. When you click on “fx” button you will get the “Insert Formula” dialog box. Click on “Insert Field or Group” button you will get “Select a Field or Group” dialog box.5. Select the Field, whose data should be taken as the file name, once the Form is submitted.
6. Select “Allow overwrite if file exists” as per your requirement and the data you will be entering in the Form. If you select this option you can also Enable Versioning on the library.7. Click “Next”. Enter a Friendly name for the Data Connection. Click “Finish”. It will again come back to the Submit Options dialog box, Click OK.
Publishing InfoPath Form to SharePoint 2007.
1. Click File Menu -> Publish. Publishing Wizard will open up.
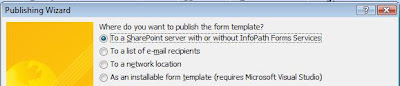 2. Select the option to publish to SharePoint server and click on “Next”
3. Now again enter the URL of the “Site Collection” and click on “Next”
 4. Make sure that the Check box is selected as the screen shot. It is recommended to select “ Site Content Type (advanced)” to avoid manual creation of the content type. Click on “Next”.
 Note:- The 3rd option “Administrator-approved Form Template (advanced)” is to be selected when the Form has Active code or any .net Programming added to the form.
5. Select “Create a new Content Type”, so that we don’t overwrite the default content type of SharePoint. Click on “Next”
 6. Enter a Friendly Name and Description for the Content Type. Click on “Next”
7. You will need the URL of a Document Library. You can copy the shortcut as shown in the screen shot. Then paste it in the Publishing Wizard and click on “Next”
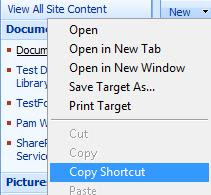
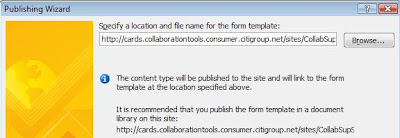 8. Add Columns to your Form Library. Click on “Next”
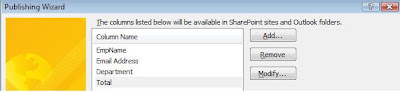 9. At the end it will give the summary of the options selected and Click on “Publish” button. Once you get the Message “Your Form template was Published Successfully” Click on the “Close” button.
2. Select the option to publish to SharePoint server and click on “Next”3. Now again enter the URL of the “Site Collection” and click on “Next”
4. Make sure that the Check box is selected as the screen shot. It is recommended to select “ Site Content Type (advanced)” to avoid manual creation of the content type. Click on “Next”.Note:- The 3rd option “Administrator-approved Form Template (advanced)” is to be selected when the Form has Active code or any .net Programming added to the form.5. Select “Create a new Content Type”, so that we don’t overwrite the default content type of SharePoint. Click on “Next”
6. Enter a Friendly Name and Description for the Content Type. Click on “Next”7. You will need the URL of a Document Library. You can copy the shortcut as shown in the screen shot. Then paste it in the Publishing Wizard and click on “Next”
8. Add Columns to your Form Library. Click on “Next”9. At the end it will give the summary of the options selected and Click on “Publish” button. Once you get the Message “Your Form template was Published Successfully” Click on the “Close” button. Adding the Published form as Content type to the Forms Library.
1. Browse to the Forms Library -> Select Settings -> Form Library Settings. You will Content Types as below. “Form” is the default content type. We have to add the new InfoPath Content type that got created while publishing the InfoPath form.
 2. Click on “Add from existing site content Types”. From the drop down list select “Microsoft Office InfoPath”. Add the “Content Type”. Click on OK.
 3. You will now see 2 Content types, the default (Form) and the one you just added. You can delete the default content type if required.
Now you can go ahead and create a New Form, the published Form should open up in Web browser.
2. Click on “Add from existing site content Types”. From the drop down list select “Microsoft Office InfoPath”. Add the “Content Type”. Click on OK.3. You will now see 2 Content types, the default (Form) and the one you just added. You can delete the default content type if required.Now you can go ahead and create a New Form, the published Form should open up in Web browser.
Not able to Export Survey list with more than 100 responses to Excel Spreadsheet
Issue:- While Exporting a Survey List, only 100 responses are exported.
No Error is logged or generated.
Resolution:- Open the Sharepoint Survey List in Sharepoint Designer. For both Overview.aspx and Allitems.aspx do the following.
No Error is logged or generated.
Resolution:- Open the Sharepoint Survey List in Sharepoint Designer. For both Overview.aspx and Allitems.aspx do the following.
Change the RowLimit element Paged property set to FALSE.
RowLimit Paged="FALSE">100</RowLimit
Change the value to True (using SP Designer 2007), otherwise it will limit the items display and export to excel.
RowLimit Paged="TRUE">100</RowLimit
Thursday, July 31, 2008
Not able to Create a New Document in Document Library
Issue:- Not able to create a New Document in Document Library.
Error:- "The exception unknown software exception (0xc06d007f) occured in the application at location 0x7c812a5b."
Environment:- Office 2003 and Office 2007 product together.
Resolution:- http://support.microsoft.com/kb/938888
Error:- "The exception unknown software exception (0xc06d007f) occured in the application at location 0x7c812a5b."
Environment:- Office 2003 and Office 2007 product together.
Resolution:- http://support.microsoft.com/kb/938888
Subscribe to:
Posts (Atom)
-
Scenario : Using Microsoft Flow you need to call HTTP Rest API methods and for that it needs Access Token authorization. You get " ...
-
You get "Cannot connect to Configuration database" while accessing Central Administration or any SharePoint sites. In Event Viewer...
-
 Scenario : you have a SharePoint List where a field with 'Person or Group' having multiple entries is selected. you want to send a ...