1. Creating and Configuring Forms Library in SharePoint.
2. Configuring InfoPath Form 2007. 3. Configure Form Submit Options.
4. Publishing InfoPath Form to SharePoint 2007.
5. Adding the Published form as Content type to the Forms Library.
Note: There are 2 types of InfoPath Forms.
a) User Form:- Only fields to be entered, where there is no Active code or programming added to the Form. These forms can be directly published to SharePoint Site. To Publish this Form, the user should be an Owner or Administrator of the Site Collection.
b) Admin Form:- These Forms have .net coding or Programming with the code which should run in the background once the Form is submitted. These Forms should be uploaded on the Central Administration and Activated for the Web Application to be used with. To publish this Form, the user should be a Farm Administrator.
 5. Select “Advanced Settings” .
6. Select “Yes” for Allow Management of Content Types.
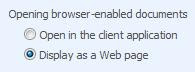
 7. For “Browse-enabled Documents” -> Select “Display as Web Page”. This option is beneficial when users do not have InfoPath 2007 installed on their local machine. The Form will open in the browse if this option is selected.
 8. Click Ok.
2. From the Tasks pane -> Select “Design Checker”
 2. After entering the details as required, click “Add” button for “Choose a data connection for Submit”
3. You will get “Data Connection Wizard” -> Copy the Form Library URL Link (created during 1st step) and paste it.
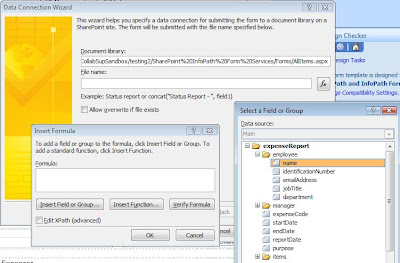 4. When you click on “fx” button you will get the “Insert Formula” dialog box. Click on “Insert Field or Group” button you will get “Select a Field or Group” dialog box.
5. Select the Field, whose data should be taken as the file name, once the Form is submitted.
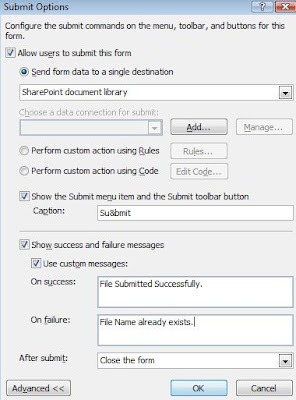
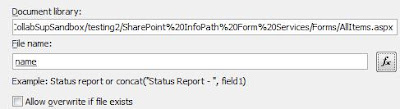 6. Select “Allow overwrite if file exists” as per your requirement and the data you will be entering in the Form. If you select this option you can also Enable Versioning on the library.
7. Click “Next”. Enter a Friendly name for the Data Connection. Click “Finish”. It will again come back to the Submit Options dialog box, Click OK.
Adding the Published form as Content type to the Forms Library.
2. Configuring InfoPath Form 2007. 3. Configure Form Submit Options.
4. Publishing InfoPath Form to SharePoint 2007.
5. Adding the Published form as Content type to the Forms Library.
Note: There are 2 types of InfoPath Forms.
a) User Form:- Only fields to be entered, where there is no Active code or programming added to the Form. These forms can be directly published to SharePoint Site. To Publish this Form, the user should be an Owner or Administrator of the Site Collection.
b) Admin Form:- These Forms have .net coding or Programming with the code which should run in the background once the Form is submitted. These Forms should be uploaded on the Central Administration and Activated for the Web Application to be used with. To publish this Form, the user should be a Farm Administrator.
Creating and Configuring Forms Library in SharePoint.
1. Browse to the SharePoint site you need to create the Forms Library.
2. Click in Site Actions -> Create -> Select “Form Library” under Libraries Section.
3. Enter the Name and the Description for the Form, Click on “Create”
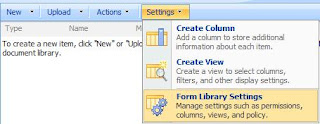
4. Once the Form Library is created -> Select Settings -> Form Library Settings
2. Click in Site Actions -> Create -> Select “Form Library” under Libraries Section.
3. Enter the Name and the Description for the Form, Click on “Create”
4. Once the Form Library is created -> Select Settings -> Form Library Settings
5. Select “Advanced Settings” .6. Select “Yes” for Allow Management of Content Types.
7. For “Browse-enabled Documents” -> Select “Display as Web Page”. This option is beneficial when users do not have InfoPath 2007 installed on their local machine. The Form will open in the browse if this option is selected.8. Click Ok.
Configuring InfoPath Form 2007
2. From the Tasks pane -> Select “Design Checker”
 3. Select “Change Compatibility Settings”. Enter the data as in below screenshot.
 Note:- The URL to be entered should be of the “Site Collection”. Not of a Subsite or Form Library URL. The user publishing this Form should be the Owner/Administrator of the Site Collection URL specified.
Note:- If you select “Backward Compatibility” option for Office 2003, some of the controls that are not support in InfoPath 2003 will not function as expected. Select it at your own risk. If you have configured the Form Library to open the Form as a Web Page, this option will not be required to be selected.
4. Click Ok.
Configuring Form Submit Options
1. Select “Tools” Menu -> “Submit Options”. You will get the below dialog box.
2. After entering the details as required, click “Add” button for “Choose a data connection for Submit”3. You will get “Data Connection Wizard” -> Copy the Form Library URL Link (created during 1st step) and paste it.
4. When you click on “fx” button you will get the “Insert Formula” dialog box. Click on “Insert Field or Group” button you will get “Select a Field or Group” dialog box.5. Select the Field, whose data should be taken as the file name, once the Form is submitted.
6. Select “Allow overwrite if file exists” as per your requirement and the data you will be entering in the Form. If you select this option you can also Enable Versioning on the library.7. Click “Next”. Enter a Friendly name for the Data Connection. Click “Finish”. It will again come back to the Submit Options dialog box, Click OK.
Publishing InfoPath Form to SharePoint 2007.
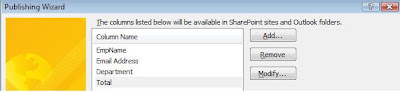
1. Click File Menu -> Publish. Publishing Wizard will open up.
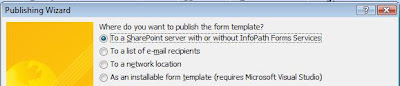 2. Select the option to publish to SharePoint server and click on “Next”
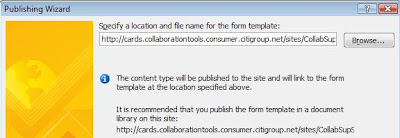
3. Now again enter the URL of the “Site Collection” and click on “Next”
 4. Make sure that the Check box is selected as the screen shot. It is recommended to select “ Site Content Type (advanced)” to avoid manual creation of the content type. Click on “Next”.
 Note:- The 3rd option “Administrator-approved Form Template (advanced)” is to be selected when the Form has Active code or any .net Programming added to the form.
5. Select “Create a new Content Type”, so that we don’t overwrite the default content type of SharePoint. Click on “Next”
 6. Enter a Friendly Name and Description for the Content Type. Click on “Next”
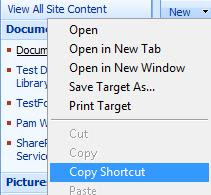
7. You will need the URL of a Document Library. You can copy the shortcut as shown in the screen shot. Then paste it in the Publishing Wizard and click on “Next”
 8. Add Columns to your Form Library. Click on “Next”
 9. At the end it will give the summary of the options selected and Click on “Publish” button. Once you get the Message “Your Form template was Published Successfully” Click on the “Close” button.
2. Select the option to publish to SharePoint server and click on “Next”3. Now again enter the URL of the “Site Collection” and click on “Next”
4. Make sure that the Check box is selected as the screen shot. It is recommended to select “ Site Content Type (advanced)” to avoid manual creation of the content type. Click on “Next”.Note:- The 3rd option “Administrator-approved Form Template (advanced)” is to be selected when the Form has Active code or any .net Programming added to the form.5. Select “Create a new Content Type”, so that we don’t overwrite the default content type of SharePoint. Click on “Next”
6. Enter a Friendly Name and Description for the Content Type. Click on “Next”7. You will need the URL of a Document Library. You can copy the shortcut as shown in the screen shot. Then paste it in the Publishing Wizard and click on “Next”
8. Add Columns to your Form Library. Click on “Next”9. At the end it will give the summary of the options selected and Click on “Publish” button. Once you get the Message “Your Form template was Published Successfully” Click on the “Close” button. Adding the Published form as Content type to the Forms Library.
1. Browse to the Forms Library -> Select Settings -> Form Library Settings. You will Content Types as below. “Form” is the default content type. We have to add the new InfoPath Content type that got created while publishing the InfoPath form.
 2. Click on “Add from existing site content Types”. From the drop down list select “Microsoft Office InfoPath”. Add the “Content Type”. Click on OK.
 3. You will now see 2 Content types, the default (Form) and the one you just added. You can delete the default content type if required.
Now you can go ahead and create a New Form, the published Form should open up in Web browser.
2. Click on “Add from existing site content Types”. From the drop down list select “Microsoft Office InfoPath”. Add the “Content Type”. Click on OK.3. You will now see 2 Content types, the default (Form) and the one you just added. You can delete the default content type if required.Now you can go ahead and create a New Form, the published Form should open up in Web browser.


12 comments:
Hi,
On Publishing InfoPath Form to SharePoint 2007 step 7. I followed these steps and entered the location of my document library. When I submit, I see no errors, but the xsn infopath document is not in the library. Where did it go?
Hello Bill,
Sorry for the late repyl. You will have to add that form as a content type to the Form library. Steps for the same are also given in the same post.
Thanks,
Parmi
Yeah, I have already added it as a content type. What I mean is, where does the template go, because even after you add it as a content type, yes you can create a new instance of the form, but if I want to edit, and check out, the versioned template itself, where does it go?
If you need to make changes to your InfoPath From. You can edit it in Info Path and republish it the same way. Just this time you wont have to re-add it as a content type.
Also you can see the Content type from Site Actions -> Site Settings but you cant make any changes from there. Best way is to make the desired changes in InfoPath and republish the form again.
So I guess if I want the infopath form stored in sharepoint and versioned, I would need to upload it manually to another document library correct?
Yes, that is correct. you will have to upload the form as a normal document file in a library, rather than publishing it to a From Library
i did not see my form fields in formlibrary. How can i get values in to my form fields in form library
hello Shabbir,
when you create a Form, you will add text fields and other form controls, you will have to name them and then while publishing the form you should be able to see the Fields as the Form Controls.
you can search for more on this on any InfoPath tutorial sites.
Cheers.
If i have to connect to a web service and refresh the data on selection what is the procedure.
Thanks in advance
Hi Srisha,
I am not from SP developer background. Web services are created by developers who integrate their custom code with SharePoint libraries. I am sorry, I have no clue on your query.
Regards,
Parmi
I know this is an old post but it helped me immensely going between SharePoint 2007 and InfoPath 2010! The one place I am having a problem is that I can't seem to get the save as part right. My form has a drop-down for users to select which project they are working on. The first one saves how I need it to, by the project name. What i need to do, is to add another option like submit date for cases of multiple submissions. I've tried setting versioning in both sharepoint and infopath, that didn't work. I have tried Submit -> properties -> options -> manage (data connection)-> and used the function button to select project name & submit date but the file name came out gibberish. I know it's probally something simple that I've overlooked, does anyone have any insight? Thank you, Amy
This article is an excellent guide to learn this process easily. As a newbie I find it very helpful and wanted to thank you for sharing the complete steps.
infopath signatures
Post a Comment